Friday, October 23, 2015

Catching up

Sometimes I forget to post some of the layouts that I just do for fun. I thought I would share a couple of recent layouts today that are disney pages that I don't think I have posted here. Not alot of info here or close ups, just sharing quickly because I thought you might like to see them.

Bioluminescent: This one is just fun and I love the title. LOL!


Chef Mickey's : Have to share this one with a close up because the "Sweet Girl" collection from EP is so cute but also because I played with my Fuse tool. Super fun


a close up of my confetti 20


City Sidewalks: I am trying to use more photos on pages so that my Albums don't take over the world. It's tricky to put three large photos on one page and not get all cluttered, but I like this one. Did you notice there isn't a title? not sure how I feel about that


Heigh Ho: this one that I totally copied from my scrappy friend Orlanda. Great paper choice and layout so I just did what she did.


Indiana Jones: And finally this one because I used some digi print and cut files. Gotta do that more. ...and see, 3 photos. :)

Snow Balls: Because it's fun.


Sunday, October 18, 2015

This is Halloween *October Scraptastic Club

Today on the Scraptastic Club Blog I am sharing a couple of my halloween layouts using the This is Halloween Kit, Add on Kit, Digital Print and Cut files, and Stamp Set.  This is a fun kit to play with even if you don't have school aged kids. 
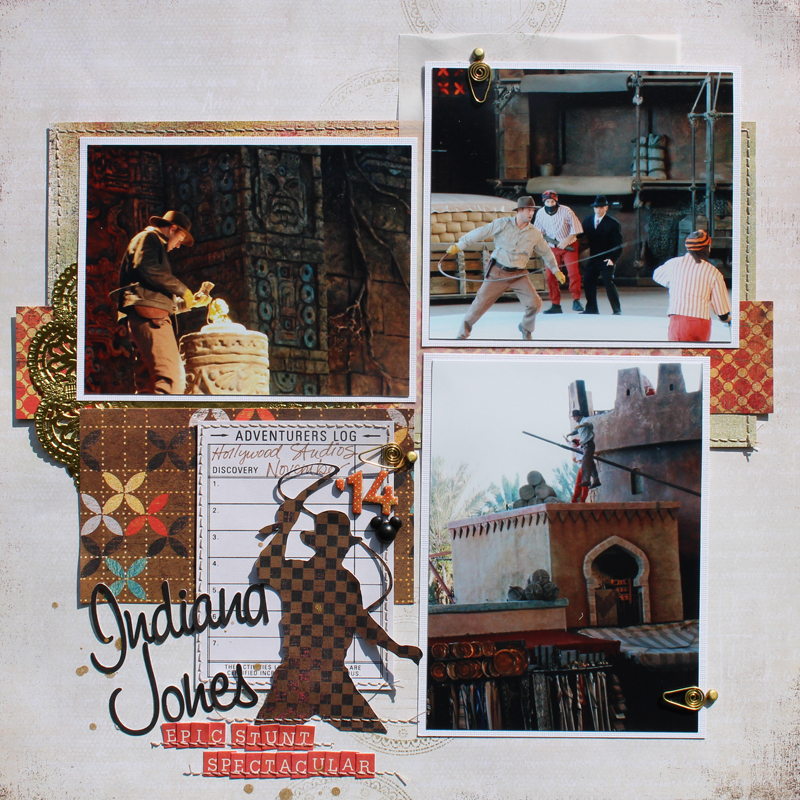
For my first layout I made a page using 3 photos from last Halloween.

Boo 

My guys are grown, but they do come over, we hand out candy, watch movies, and have grown up treats. Since we had a apple theme with our food last year, I stamped the row of pumpkins stamp on my journaling sticker and it kind of looks like apples, which is cool. I just love these word and star black glitter Thickers, they are even better in person.

boo 2 

For this page, I also used the October This Life Noted Digital Cut file (here), and I added pieces of one of the patterned papers behind some of the triangles.  Of course the best part is the cute little exclusive vellum die cut ghost.

boo 1 

Now for my second layout I have a little flash back. I had some of my dad's old slides printed and this was one of them. I just love the old retro cookie cutter costumes with those silly masks that you can't see through.

halloween 1968 

I like to make a circle of fun embellishments on pages and this kit has some fantastic little enamel shapes as well as exclusive puffy stickers and super cute die cuts. The stamp set has a row of scattered stars, but I only wanted a few in each spot so I carefully inked only 3 of the stars and stamped around my circle in clusters. I used the black glittered Thickers for a title again and one very cool thing about these is that they are so flexible that I easily made an arc with the title "halloween".

halloween 1968 1 

When I stamped the stars I used a watercolor brush with watercolor pencils to paint them orange. I had to share a close up because the epoxy kitty is just too darn cute.

halloween 1968 2

Tuesday, October 06, 2015

Vintage Halloween *October Scraptastic Club kit

Today I am going to share my first layout using the October "This is Halloween" kit, Add on kit, and the digital Print and Cut files. The exclusive digital elements are one of the things that I really look forward to each month with Scraptastic's kits. If you haven't used them, be sure to check them out this month. There is a cut file, a print and cut label sheet, and a print and cut die cut sheet to coordinate with each kit. Of course you can use a die cutting machine like the Silhouette machines, but you can print the labels or die cuts and cut them out by hand as well.

For my layout I used a white cardstock background, a couple of small pieces of patterned papers, and all of the labels and die cuts are the digital files from this kit.

vintage halloween 

I used some Thickers Alphas from a past kit for my title along with the Halloween spider web digital cut file. I cut it from clear vellum from my stash.

Tip: if you cut designs from vellum, you need an older mat or it be too sticky, and when you try to take the vellum off, it will tear. Remove it very slowly and carefully using a tool like a spatula. I have two tears in mine, but they don't really show so I don't mind.

vintage halloween 2 

Around the perimeter of the white cardstock background I drew two lines with a black marker and then filled in with an orange colored pencil.

vintage halloween 1


Friday, October 02, 2015

DCWV October Stack-a-holic Sketch challenge

It's time for the October Stack-a-holic Sketch Challenge at DCWV's Blog. If you love DCWV stacks, CLICK HERE to see all of the inspiration and to play along.

Here's the sketch, #151 from Sketch Savvy


And for my example I used the new DCWV Spooky Delight Stack


I also used gold dot vellum from the 6x6 Foiled Vellum stack, but in these photos it totally looks black, just believe me, its gold :) Also hard to see, the black parts of the patterned paper are sort of shiny like black foil.